# NEXUS LABS TESTNET II

### 1/ Install [Kali linux](https://apps.microsoft.com/detail/9PKR34TNCV07?hl=en-us\&gl=US\&ocid=pdpshare) on Microsoft Store for Linux Shell

<figure><img src="https://1753696557-files.gitbook.io/~/files/v0/b/gitbook-x-prod.appspot.com/o/spaces%2Fg2KP8Hry9Eag6gvUV7ir%2Fuploads%2FBi9vA1IAzlZJiF8V9snQ%2Fimage.png?alt=media&#x26;token=1d97bb63-02ba-4cab-9044-f438dbfb8f07" alt=""><figcaption></figcaption></figure>

### 2/ How to Install Ubuntu? <a href="#how-to-install-ubuntu" id="how-to-install-ubuntu"></a>

Search on your PC [Micosoft Store](https://learn.microsoft.com/en-us/windows/wsl/install-manual#step-6---install-your-linux-distribution-of-choice)

<figure><img src="https://traderg-space.gitbook.io/~gitbook/image?url=https%3A%2F%2F1753696557-files.gitbook.io%2F%7E%2Ffiles%2Fv0%2Fb%2Fgitbook-x-prod.appspot.com%2Fo%2Fspaces%252Fg2KP8Hry9Eag6gvUV7ir%252Fuploads%252FamOPKiT50sQNxKXPhyQ3%252Fimage.png%3Falt%3Dmedia%26token%3Daaff0bff-1397-4c7a-b944-cd37c3837998&#x26;width=768&#x26;dpr=4&#x26;quality=100&#x26;sign=8fbedef9&#x26;sv=2" alt=""><figcaption></figcaption></figure>

Search **Ubuntu Install Ubuntu 22.04.5 LTS**

<figure><img src="https://traderg-space.gitbook.io/~gitbook/image?url=https%3A%2F%2F1753696557-files.gitbook.io%2F%7E%2Ffiles%2Fv0%2Fb%2Fgitbook-x-prod.appspot.com%2Fo%2Fspaces%252Fg2KP8Hry9Eag6gvUV7ir%252Fuploads%252F6tv0qxf1j0yyBPGz0v7k%252Fimage.png%3Falt%3Dmedia%26token%3D0dd89d2e-a68b-40fb-9102-a1fab33a7404&#x26;width=768&#x26;dpr=4&#x26;quality=100&#x26;sign=6e8d96cb&#x26;sv=2" alt=""><figcaption></figcaption></figure>

Once you Installed

### 3/ How to Enable WSL and Subsystem Linux <a href="#how-to-enable-wsl-and-subsystem-linux" id="how-to-enable-wsl-and-subsystem-linux"></a>

#### Step 1 - Enable the Windows Subsystem for Linux <a href="#step-1---enable-the-windows-subsystem-for-linux" id="step-1---enable-the-windows-subsystem-for-linux"></a>

You must first enable the "**Windows Subsystem for Linux**" optional feature before installing any Linux distributions on Windows.

<figure><img src="https://traderg-space.gitbook.io/~gitbook/image?url=https%3A%2F%2F1753696557-files.gitbook.io%2F%7E%2Ffiles%2Fv0%2Fb%2Fgitbook-x-prod.appspot.com%2Fo%2Fspaces%252Fg2KP8Hry9Eag6gvUV7ir%252Fuploads%252FoyZFbfKRZXGeY9K7jJZt%252Fimage.png%3Falt%3Dmedia%26token%3D7b31d16e-0374-40b7-bd74-eed41982eab0&#x26;width=768&#x26;dpr=4&#x26;quality=100&#x26;sign=86b0700a&#x26;sv=2" alt=""><figcaption></figcaption></figure>

* Enable Windows Subsystem Linux for Linux

<figure><img src="https://traderg-space.gitbook.io/~gitbook/image?url=https%3A%2F%2F1753696557-files.gitbook.io%2F%7E%2Ffiles%2Fv0%2Fb%2Fgitbook-x-prod.appspot.com%2Fo%2Fspaces%252Fg2KP8Hry9Eag6gvUV7ir%252Fuploads%252FUfz4PyWy3s7IRfotfghQ%252Fimage.png%3Falt%3Dmedia%26token%3D70aa83b4-92c3-4ec0-8f01-0bc847dc1b12&#x26;width=768&#x26;dpr=4&#x26;quality=100&#x26;sign=ae4768dc&#x26;sv=2" alt=""><figcaption></figcaption></figure>

Run Open PowerShell **as Administrator (Start menu > PowerShell > right-click > Run as Administrator)** and enter this command:

<figure><img src="https://traderg-space.gitbook.io/~gitbook/image?url=https%3A%2F%2F1753696557-files.gitbook.io%2F%7E%2Ffiles%2Fv0%2Fb%2Fgitbook-x-prod.appspot.com%2Fo%2Fspaces%252Fg2KP8Hry9Eag6gvUV7ir%252Fuploads%252FyutZ7yA7KA0oNDrRw7iD%252Fimage.png%3Falt%3Dmedia%26token%3Dc1650030-7f5b-4f40-8337-22d30ca3e491&#x26;width=768&#x26;dpr=4&#x26;quality=100&#x26;sign=b2eb88fe&#x26;sv=2" alt=""><figcaption></figcaption></figure>

Copy This Command

Copy

```
dism.exe /online /enable-feature /featurename:Microsoft-Windows-Subsystem-Linux /all /norestart
```

**Download the latest package:**

* [WSL2 Linux kernel update package for x64 machines](https://wslstorestorage.blob.core.windows.net/wslblob/wsl_update_x64.msi)

1. Run the update package downloaded in the previous step. (Double-click to run - you will be prompted for elevated permissions, select ‘yes’ to approve this installation.)

#### Set WSL 2 as your default version <a href="#step-5---set-wsl-2-as-your-default-version" id="step-5---set-wsl-2-as-your-default-version"></a>

Open PowerShell and run this command to set WSL 2 as the default version when installing a new Linux distribution:

Copy

<pre><code><strong>wsl --set-default-version 2
</strong></code></pre>

### 4/ Run a CLI Node&#x20;

Go to <https://app.nexus.xyz/nodes> sign in Email or exist Account if you Participate on testnet 1

Run a node By simple Open Click Connect

**Open Ubuntu**&#x20;

**Run a CLI NODE Copy and paste**

**1/ Code**

```
sudo apt update -y
 apt install unzip tmux git -y
sudo apt install build-essential -y
sudo apt install -y pkg-config libssl-dev -y
cd /usr/local
sudo wget https://github.com/protocolbuffers/protobuf/releases/download/v29.3/protoc-29.3-linux-x86_64.zip
sudo unzip protoc-29.3-linux-x86_64.zip
sudo chmod +x /usr/local/bin/protoc
curl --proto '=https' --tlsv1.2 -sSf https://sh.rustup.rs | sh
. "$HOME/.cargo/env"
source $HOME/.cargo/env
```

**2/ Code**

```sudo
tmux new -s nexus
```

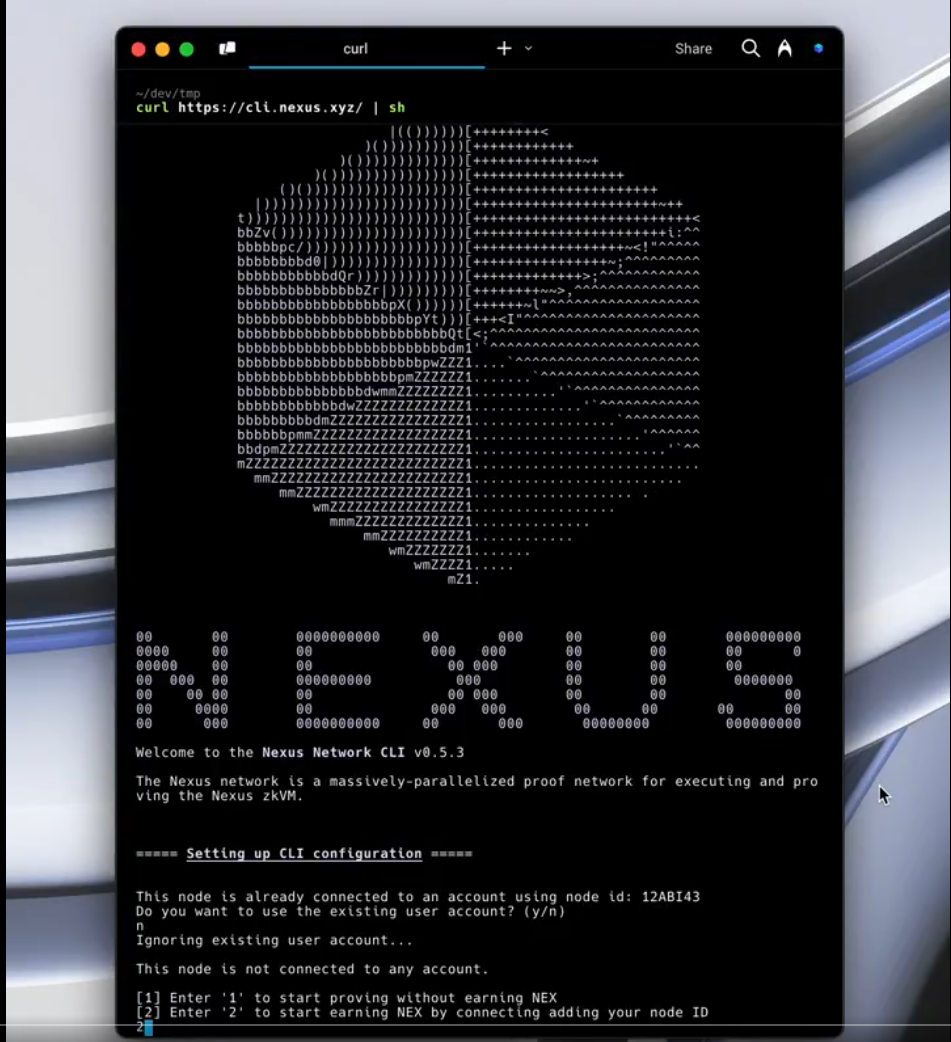
3/ After you enter, Erase the blank, and chose 2 hit enter

```
curl https://cli.nexus.xyz/ | sh
```

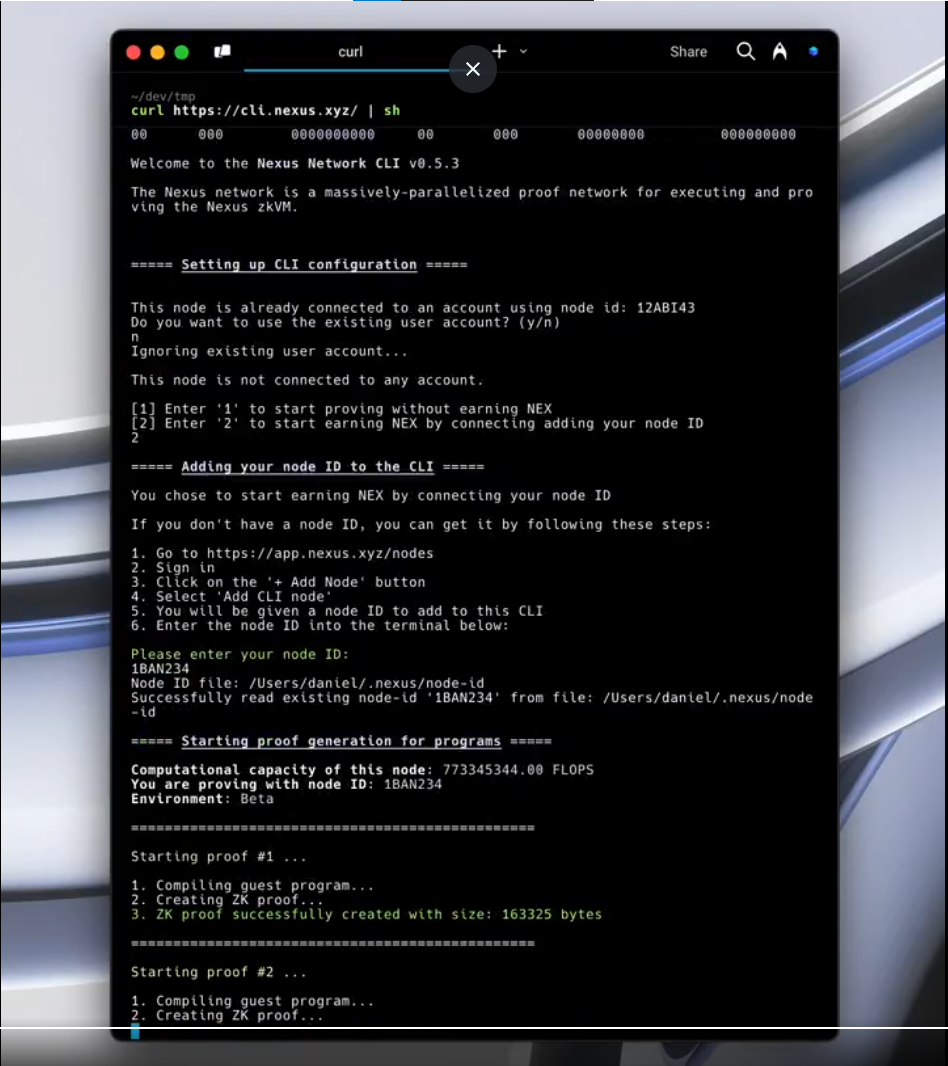
**4/ Add Node > Add CLI Node**

<figure><img src="https://1753696557-files.gitbook.io/~/files/v0/b/gitbook-x-prod.appspot.com/o/spaces%2Fg2KP8Hry9Eag6gvUV7ir%2Fuploads%2FcWINb40YQ23dW9YDlA4r%2Fimage.png?alt=media&#x26;token=1bc176b5-ab5d-4e6e-ad70-3b07d5f073a4" alt=""><figcaption></figcaption></figure>

Once you see Paste the code CLI on 3/ you see this in image, to not encounter error just long press the backspace to erase hide code, then input 2 hit enter

<figure><img src="https://1753696557-files.gitbook.io/~/files/v0/b/gitbook-x-prod.appspot.com/o/spaces%2Fg2KP8Hry9Eag6gvUV7ir%2Fuploads%2FmOt1wy1PWanNgw9PBgcO%2Fimage.png?alt=media&#x26;token=81575ba3-72c5-44fd-86e5-41e6ab9853a9" alt=""><figcaption></figcaption></figure>

You see this Enter your Node ID by doing the step 4/ add node cli step guide

<figure><img src="https://1753696557-files.gitbook.io/~/files/v0/b/gitbook-x-prod.appspot.com/o/spaces%2Fg2KP8Hry9Eag6gvUV7ir%2Fuploads%2Fp8MGNDCf3kMWqJN8zBN6%2Fimage.png?alt=media&#x26;token=e365f5fa-1362-4e61-bd0c-6feb3dea60d0" alt=""><figcaption></figcaption></figure>

AFTER THAT YOUR ALL SET!&#x20;

<figure><img src="https://1753696557-files.gitbook.io/~/files/v0/b/gitbook-x-prod.appspot.com/o/spaces%2Fg2KP8Hry9Eag6gvUV7ir%2Fuploads%2FfBQN8v1hXMdAC9vbGvxR%2Fimage.png?alt=media&#x26;token=96c838c7-1d12-4bc9-bd00-8909b74555c0" alt=""><figcaption></figcaption></figure>

***

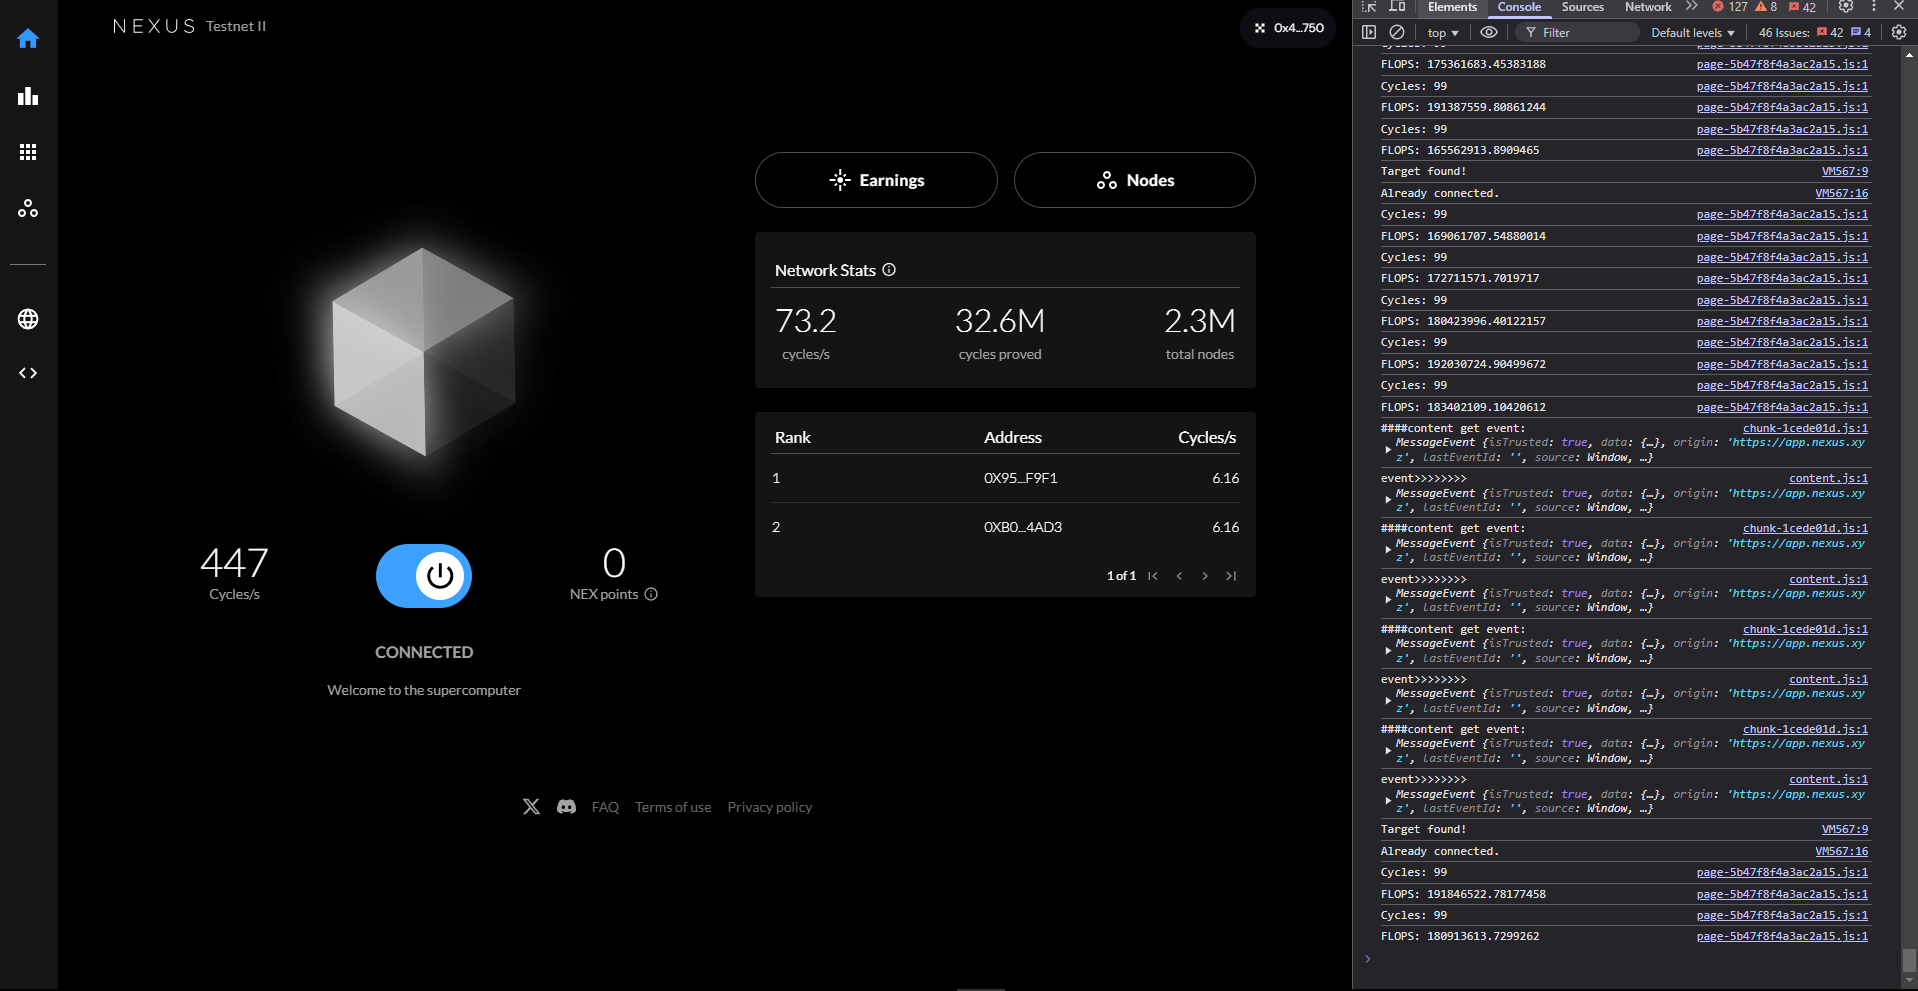
### ABOUT ON SIMPLE CLICK TO FIX THE ISSUE&#x20;

<figure><img src="https://1753696557-files.gitbook.io/~/files/v0/b/gitbook-x-prod.appspot.com/o/spaces%2Fg2KP8Hry9Eag6gvUV7ir%2Fuploads%2FppCQKPfAO6lExTZLSOOj%2Fimage.png?alt=media&#x26;token=394b6dd7-f3d6-41d6-aaf5-8acf073b2db1" alt=""><figcaption></figcaption></figure>

PRESS **F12 > Console > Scroll Below you see the part, type "allowing paste" > after you do that step copy the code below and paste it and enter, Done.**

```
(function autoClick() {
    const targetSelector = '.relative.w-24.h-16.rounded-full.cursor-pointer';
    const checkInterval = 2000; // Check every 2 seconds

    function checkAndClick() {
        const target = document.querySelector(targetSelector);

        if (target) {
            console.log("Target found!");

            const img = target.querySelector('img[alt="Circle Image"]');
            if (img && img.classList.contains("brightness-0") && img.classList.contains("invert")) {
                console.log("Not connected! Clicking...");
                target.click();
            } else {
                console.log("Already connected.");
            }
        } else {
            console.log("Target not found.");
        }
    }

    setInterval(checkAndClick, checkInterval);
})();
```
