# BLOCKAST

## Requirements:

**Ensure Hardware Requirements**: Use a device (**Linux, macOS, ChromeOS, or Windows**) with at least **8GB** RAM, **100GB** storage, and a stable internet connection with sufficient bandwidth.

### Install [Kali linux](https://apps.microsoft.com/detail/9PKR34TNCV07?hl=en-us\&gl=US\&ocid=pdpshare) on Microsoft Store for Linux Shell

<figure><img src="https://1753696557-files.gitbook.io/~/files/v0/b/gitbook-x-prod.appspot.com/o/spaces%2Fg2KP8Hry9Eag6gvUV7ir%2Fuploads%2F9ceREkEa94J6jdgr0b4j%2Fimage.png?alt=media&#x26;token=1bab491a-4d64-463a-8305-3c41afe1e721" alt=""><figcaption></figcaption></figure>

## How to Install Ubuntu?

Search on your PC [Micosoft Store](https://learn.microsoft.com/en-us/windows/wsl/install-manual#step-6---install-your-linux-distribution-of-choice)&#x20;

<figure><img src="https://1753696557-files.gitbook.io/~/files/v0/b/gitbook-x-prod.appspot.com/o/spaces%2Fg2KP8Hry9Eag6gvUV7ir%2Fuploads%2FamOPKiT50sQNxKXPhyQ3%2Fimage.png?alt=media&#x26;token=aaff0bff-1397-4c7a-b944-cd37c3837998" alt=""><figcaption></figcaption></figure>

Search **Ubuntu Install Ubuntu 22.04.5 LTS**

<figure><img src="https://1753696557-files.gitbook.io/~/files/v0/b/gitbook-x-prod.appspot.com/o/spaces%2Fg2KP8Hry9Eag6gvUV7ir%2Fuploads%2F6tv0qxf1j0yyBPGz0v7k%2Fimage.png?alt=media&#x26;token=0dd89d2e-a68b-40fb-9102-a1fab33a7404" alt=""><figcaption></figcaption></figure>

Once you Installed&#x20;

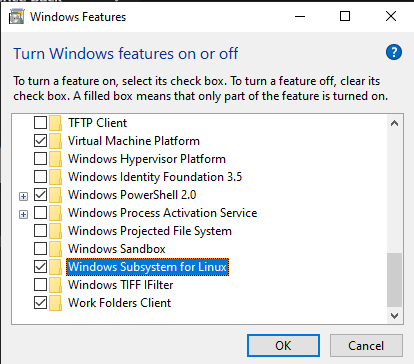
## How to Enable WSL and Subsystem Linux

### Step 1 - Enable the Windows Subsystem for Linux <a href="#step-1---enable-the-windows-subsystem-for-linux" id="step-1---enable-the-windows-subsystem-for-linux"></a>

You must first enable the "**Windows Subsystem for Linux**" optional feature before installing any Linux distributions on Windows.

<figure><img src="https://1753696557-files.gitbook.io/~/files/v0/b/gitbook-x-prod.appspot.com/o/spaces%2Fg2KP8Hry9Eag6gvUV7ir%2Fuploads%2FoyZFbfKRZXGeY9K7jJZt%2Fimage.png?alt=media&#x26;token=7b31d16e-0374-40b7-bd74-eed41982eab0" alt=""><figcaption></figcaption></figure>

* Enable Windows Subsystem Linux for Linux

<figure><img src="https://1753696557-files.gitbook.io/~/files/v0/b/gitbook-x-prod.appspot.com/o/spaces%2Fg2KP8Hry9Eag6gvUV7ir%2Fuploads%2FUfz4PyWy3s7IRfotfghQ%2Fimage.png?alt=media&#x26;token=70aa83b4-92c3-4ec0-8f01-0bc847dc1b12" alt=""><figcaption></figcaption></figure>

Run Open PowerShell **as Administrator (Start menu > PowerShell > right-click > Run as Administrator)** and enter this command:

<figure><img src="https://1753696557-files.gitbook.io/~/files/v0/b/gitbook-x-prod.appspot.com/o/spaces%2Fg2KP8Hry9Eag6gvUV7ir%2Fuploads%2FyutZ7yA7KA0oNDrRw7iD%2Fimage.png?alt=media&#x26;token=c1650030-7f5b-4f40-8337-22d30ca3e491" alt=""><figcaption></figcaption></figure>

Copy This Command

```
dism.exe /online /enable-feature /featurename:Microsoft-Windows-Subsystem-Linux /all /norestart
```

#### Download the latest package:

* [WSL2 Linux kernel update package for x64 machines](https://wslstorestorage.blob.core.windows.net/wslblob/wsl_update_x64.msi)

1. Run the update package downloaded in the previous step. (Double-click to run - you will be prompted for elevated permissions, select ‘yes’ to approve this installation.)

### Set WSL 2 as your default version <a href="#step-5---set-wsl-2-as-your-default-version" id="step-5---set-wsl-2-as-your-default-version"></a>

Open PowerShell and run this command to set WSL 2 as the default version when installing a new Linux distribution:

```
wsl --set-default-version 2
```

### Enable virtualization on BIOS

> Watch few Tutorials on [Youtube](https://www.youtube.com/results?search_query=enable+virtualization)

## Install Git bash

[Download Link](https://git-scm.com/downloads)

## Install Docker Desktop

[Download Link](https://docs.docker.com/desktop/setup/install/windows-install/)

## Setup Guide

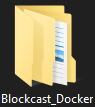
Create New Folder on **Downloads (or where you want file path)** in your File Explorer

* FIle name "**Blockcast\_Docker**"

<div align="left"><figure><img src="https://1753696557-files.gitbook.io/~/files/v0/b/gitbook-x-prod.appspot.com/o/spaces%2Fg2KP8Hry9Eag6gvUV7ir%2Fuploads%2FK1XJ7bUZmX6JvFMTbYIv%2Fimage.png?alt=media&#x26;token=1737178a-ef84-416f-98a2-5683f4eb0372" alt=""><figcaption></figcaption></figure></div>

Open Git bash

* If you Create File on Downloads Follow this Command **Step by Step**

Step 1:

```
cd ./Downloads/Blockcast_Docker
```

<div align="left"><figure><img src="https://1753696557-files.gitbook.io/~/files/v0/b/gitbook-x-prod.appspot.com/o/spaces%2Fg2KP8Hry9Eag6gvUV7ir%2Fuploads%2FhLnMuXFUqJmLaj1o81mP%2Fimage.png?alt=media&#x26;token=530ff699-5380-4eb9-9f50-2d6c619af6fd" alt=""><figcaption></figcaption></figure></div>

Step 2:&#x20;

```
git clone https://github.com/Blockcast/beacon-docker-compose.git
```

<div align="left"><figure><img src="https://1753696557-files.gitbook.io/~/files/v0/b/gitbook-x-prod.appspot.com/o/spaces%2Fg2KP8Hry9Eag6gvUV7ir%2Fuploads%2FxPDLWiRpV2nD673mfYTL%2Fimage.png?alt=media&#x26;token=276bcc2f-4ad9-47f4-aab2-11eb24af3c84" alt=""><figcaption></figcaption></figure></div>

Step 3:

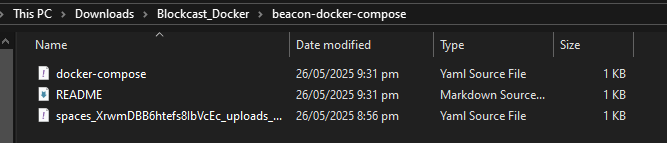
**Download BEACON Software**: Obtain the [docker-compose.yml](https://3364791352-files.gitbook.io/~/files/v0/b/gitbook-x-prod.appspot.com/o/spaces%2FXrwmDBB6htefs8IbVcEc%2Fuploads%2Fgit-blob-8f9e8f22b06224656c3a0b8e79a0b6e000d6597c%2Fdocker-compose.yml?alt=media) inside File path where located **Blockcast\_Docker**

(**Example**)

<figure><img src="https://1753696557-files.gitbook.io/~/files/v0/b/gitbook-x-prod.appspot.com/o/spaces%2Fg2KP8Hry9Eag6gvUV7ir%2Fuploads%2FOUY7exdTHy6kd1elO15U%2Fimage.png?alt=media&#x26;token=fc0f06b7-8f03-4f9e-89fd-831e2a56cfe4" alt=""><figcaption></figcaption></figure>

<figure><img src="https://1753696557-files.gitbook.io/~/files/v0/b/gitbook-x-prod.appspot.com/o/spaces%2Fg2KP8Hry9Eag6gvUV7ir%2Fuploads%2FF80TwlEbiSZR9TTthUtW%2Fimage.png?alt=media&#x26;token=a2718155-d693-427f-984e-de67072048d3" alt=""><figcaption></figcaption></figure>

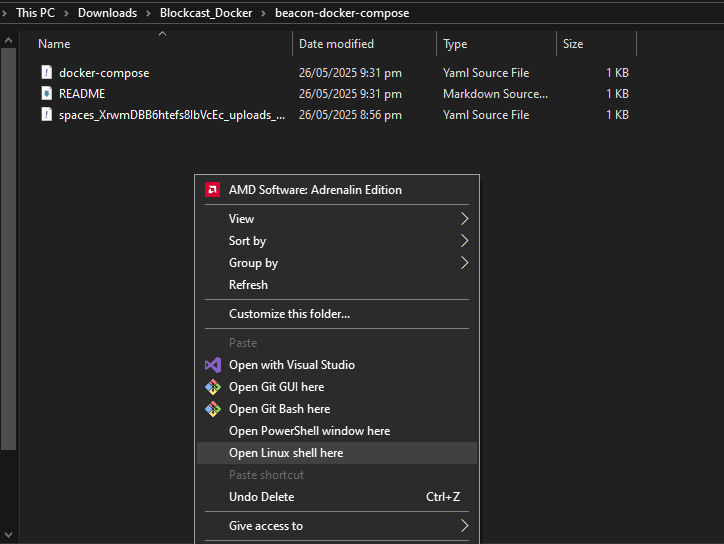
Step 4: Go to inside on your File Path Folder

"**Shift** + **Right Click**" Should be looks like on Picture

<figure><img src="https://1753696557-files.gitbook.io/~/files/v0/b/gitbook-x-prod.appspot.com/o/spaces%2Fg2KP8Hry9Eag6gvUV7ir%2Fuploads%2FGy0yi1wPsaEJPlXACW6N%2Fimage.png?alt=media&#x26;token=733c9d90-68a1-4682-8f84-316ae3386681" alt=""><figcaption></figcaption></figure>

<div align="left"><figure><img src="https://1753696557-files.gitbook.io/~/files/v0/b/gitbook-x-prod.appspot.com/o/spaces%2Fg2KP8Hry9Eag6gvUV7ir%2Fuploads%2Fm5XLKu2gBBFq8GXXEuhs%2Fimage.png?alt=media&#x26;token=6324520a-8878-4329-a337-78aa5852079d" alt=""><figcaption></figcaption></figure></div>

Step 5: **Generate hardware and challenge key**

```
docker compose up -d
```

```
docker compose exec blockcastd blockcastd init
```

It would generate an output that contains your device's **Hardware ID, Challenge Key and a Registration** URL:

Example:

```
Hardware ID:
------------
c6ff0e6f-bc4d-4151-47c3-07df0e3cf53f

Challenge Key:
--------------
MCowBQYDK2VwAyEAXP49l4pBK1V5qy7vbRJYv3etRdEr7ycsQAvrgS+hQY0=

Register URL:
-------------
https://app.blockcast.network/register?hwid=c6ff0e6f-bc4d-4151-47c3-07df0e3cf53f&
```

1. Go to our web portal <https://app.blockcast.network/> and log in/register
2. Copy and paste the Registration URL from the console output with your pre-filled Hardware ID and Challenge Key into your browser, OR
3. Go to Manage Nodes page, press **Register Node** button, and manually enter your keys in the portal registration flow

<figure><img src="https://1753696557-files.gitbook.io/~/files/v0/b/gitbook-x-prod.appspot.com/o/spaces%2Fg2KP8Hry9Eag6gvUV7ir%2Fuploads%2FH1RR77PzkNrZHWTY9nTl%2Fimage.png?alt=media&#x26;token=a720998e-e0c1-43f9-9df2-88d814467975" alt=""><figcaption></figcaption></figure>

<figure><img src="https://1753696557-files.gitbook.io/~/files/v0/b/gitbook-x-prod.appspot.com/o/spaces%2Fg2KP8Hry9Eag6gvUV7ir%2Fuploads%2Fqx1Hb82y6qMmsaYnZiHq%2Fimage.png?alt=media&#x26;token=895cd85d-b9be-47ee-b5e4-d35ddbd8f020" alt=""><figcaption></figcaption></figure>

<figure><img src="https://1753696557-files.gitbook.io/~/files/v0/b/gitbook-x-prod.appspot.com/o/spaces%2Fg2KP8Hry9Eag6gvUV7ir%2Fuploads%2F2z0VGFltQTjW0LmOo2KF%2Fimage.png?alt=media&#x26;token=48b73d0c-1121-4327-a608-cdde800df7ba" alt=""><figcaption></figcaption></figure>

Step 6: **Launch and start running Blockcast Beacon**

1. Start running your Blockcast BEACON with command `docker compose up -d` from the folder where `docker-compose.yml` is saved
2. Verify everything is up and healthy with `docker compose ps`

   Copy

   ```
   NAME                                 COMMAND                  SERVICE             STATUS              PORTS
   beacon-docker-compose-watchtower-1   "/watchtower"            watchtower          running (healthy)   8080/tcp
   beacond                              "envdir /var/opt/mag…"   beacond             running
   blockcastd                           "/usr/bin/blockcastd…"   blockcastd          running
   control_proxy                        "/usr/bin/control_pr…"   control_proxy       ru
   ```
